
Thực hiện theo các bước sau đây để cài đặt module Real IP cho NGINX trên CentOS 7.
Kiểm tra module Real IP NGINX
Dùng command bên dưới để kiểm tra module ngx_http_realip_module đã được compile cùng NGINX hay chưa.
nginx -V 2>&1 | grep -o 'http_realip_module'Nếu chưa có module này, tiến hành compile lại NGINX để add thêm module.
Compile NGINX
Update system.
yum update -y && yum upgrade -yNGINX được viết bằng ngôn ngữ C, vì vậy để compile NGINX cần phải cài C compiler (GCC) và các thành phần khác.
yum install gcc gcc-c++ glibc-devel make openssl-devel zlib-devel pcre-devel wget -yTải bản NGINX mới nhất tại:
# Stable version
wget https://nginx.org/download/nginx-1.18.0.tar.gz && tar zxvf nginx-1.18.0.tar.gz
# Mainline version
wget https://nginx.org/download/nginx-1.19.8.tar.gz && tar zxvf nginx-1.19.8.tar.gzCài đặt module Real IP cho NGINX
Di chuyển tới thư mục chứa source code NGINX.
cd ~/nginx-1.18.0Để giữ lại vị trí các file config, danh sách các module sau khi build giống với môi trường hiện tại, ta dùng lệnh sau để lấy compile string của phiên bản NGINX đang chạy:
nginx -VCopy lại compile string bắt đầu từ sau đoạn “configure arguments:” cho đến hết, và chèn thêm “–with-http_realip_module” ở cuối để enable module http_realip_module
./configure --prefix=/usr/share/nginx \
            --sbin-path=/usr/bin/nginx \
            --modules-path=/usr/lib/nginx/modules \
            --conf-path=/etc/nginx/nginx.conf \
            --error-log-path=/var/log/nginx/error.log \
            --http-log-path=/var/log/nginx/access.log \
            --pid-path=/run/nginx.pid \
            --lock-path=/var/lock/nginx.lock \
            --user=www-data \
            --group=www-data \
            --build=Ubuntu \
            --http-client-body-temp-path=/var/lib/nginx/body \
            --http-fastcgi-temp-path=/var/lib/nginx/fastcgi \
            --http-proxy-temp-path=/var/lib/nginx/proxy \
            --http-scgi-temp-path=/var/lib/nginx/scgi \
            --http-uwsgi-temp-path=/var/lib/nginx/uwsgi \
            --with-openssl-opt=enable-ec_nistp_64_gcc_128 \
            --with-openssl-opt=no-nextprotoneg \
            --with-openssl-opt=no-weak-ssl-ciphers \
            --with-openssl-opt=no-ssl3 \
            --with-pcre-jit \
            --with-compat \
            --with-file-aio \
            --with-threads \
            --with-http_addition_module \
            --with-http_auth_request_module \
            --with-http_dav_module \
            --with-http_flv_module \
            --with-http_gunzip_module \
            --with-http_gzip_static_module \
            --with-http_mp4_module \
            --with-http_random_index_module \
            --with-http_slice_module \
            --with-http_ssl_module \
            --with-http_sub_module \
            --with-http_stub_status_module \
            --with-http_v2_module \
            --with-http_secure_link_module \
            --with-mail \
            --with-mail_ssl_module \
            --with-stream \
            --with-stream_realip_module \
            --with-stream_ssl_module \
            --with-stream_ssl_preread_module \
            --with-debug \
            --with-http_realip_module
Tiến hành Compile.
make && sudo make install
mkdir -p /var/lib/nginx && sudo nginx -t
groupadd -r www-data
useradd -r -s /sbin/nologin -d /dev/null -g www-data www-data
mkdir -p /var/lib/nginx/{body,fastcgi}
Kiểm tra NGINX Version và compile string.
sudo nginx -v && sudo nginx -VOutput.
nginx version: nginx/1.18.0 (Ubuntu)
built by gcc 4.8.5 20150623 (Red Hat 4.8.5-44) (GCC)
built with OpenSSL 1.0.2k-fips  26 Jan 2017
TLS SNI support enabled
configure arguments: --prefix=...
...
Chạy lại command để kiểm tra module Real IP NGINX đã được cài đặt thành công hay chưa.
nginx -V 2>&1 | grep -o 'http_realip_module'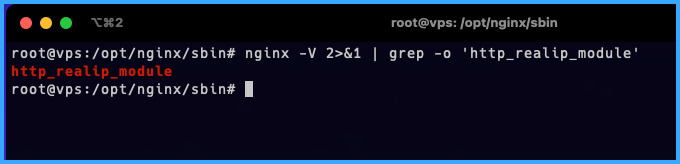
Tạo Systemd service cho NGINX
Chạy command để mở file nginx.service.
sudo vi /etc/systemd/system/nginx.servicePaste nội dung bên dưới vào cửa sổ vim vừa mở.
[Unit]
Description=A high performance web server and a reverse proxy server
After=network.target

[Service]
Type=forking
PIDFile=/run/nginx.pid
ExecStartPre=/usr/bin/nginx -t -q -g 'daemon on; master_process on;'
ExecStart=/usr/bin/nginx -g 'daemon on; master_process on;'
ExecReload=/usr/bin/nginx -g 'daemon on; master_process on;' -s reload
ExecStop=-/bin/start-stop-daemon --quiet --stop --retry QUIT/5 --pidfile /run/nginx.pid
TimeoutStopSec=5
KillMode=mixed

[Install]
WantedBy=multi-user.target
Start nginx và tùy chọn để nginx khởi động cùng hệ thống.
sudo systemctl start nginx.service
sudo systemctl enable nginx.service
Như vậy là hoàn tất. Hy vọng bài viết những hướng dẫn này sẽ giúp cho các bạn cài đặt module Real IP NGINX trên CentOS 7 một cách nhanh chóng nhất. Nếu có thắc mắc xin vui lòng liên hệ hotline 1800 1093 để được hỗ trợ giải đáp nhanh chóng.
BÀI VIẾT LIÊN QUAN
- Các gói Hosting tại Vietnix + Mã giảm giá
- Hướng dẫn đăng ký mua Hosting tại Vietnix
- Hướng dẫn cài đặt DirectAdmin trên CentOS, Ubuntu
- Tắt và bật firewalld trên CentOS 7

VIETNIX - DỊCH VỤ HOSTING, VPS TỐC ĐỘ CAO
- Địa chỉ: 265 Hồng Lạc, Phường 10, Quận Tân Bình, Thành Phố Hồ Chí Minh
- Điện thoại: 1800 1093
- Email liên hệ: sales@vietnix.com.vn
- Website: https://vietnix.vn/